Here is the first of a series of posts about the project I've been working on since last August to re-do my master bedroom. I hope some of my tips might be helpful to those of you looking to redecorate on a budget.
THE DRESSERS
Dresser A (Mary's):
Last year when Edwin came to stay with us, I sent out an email to my neighborhood looking for a spare dresser. I had a few replies, and picked up this lovely little dresser that used to belong to a friend's grandmother. I question her sanity for giving it away, but I am grateful! I liked it so much that I gave Edwin my old dresser and kept this one for myself.
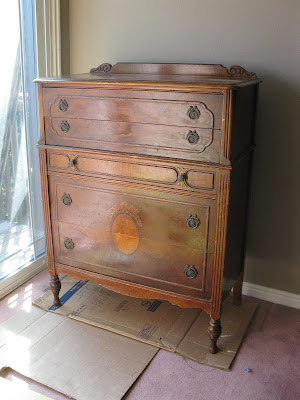
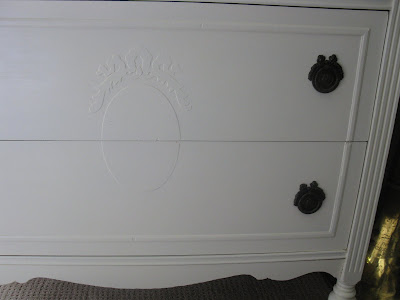
It was cute to begin with, but natural wood colors don't work in my makeover plans. I decided to paint it a charming country white.
Dresser B (Kent's):
My friends convinced me to paint Kent's armoire dresser, which I was ready to give away. I think this used to belong to my great aunt and uncle. Kent freaked out a little that I would think of painting solid wood, but since we no longer live in the 1970s, it was either paint it or lug the thing to DI.
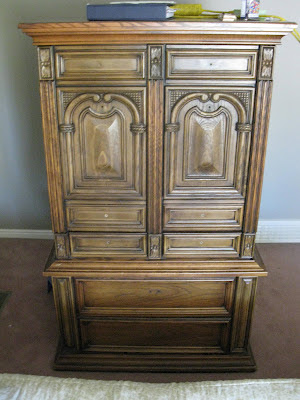
(His dresser did have hardware. I forgot to snap a picture before I removed it all.)
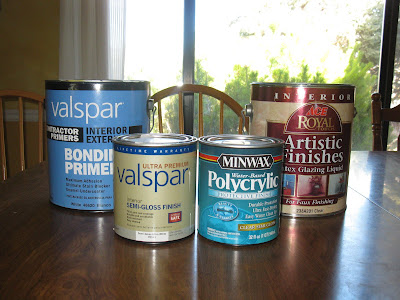
Because I don't want to repeat this project any time soon, I did some research to learn the best painting techniques for a lasting finish. Here are links to the helpful websites I visited:
Paint processGlazing tutorialWhen to glaze and top coat Step-by-step of a similar dresser project Yeeeaah...overkill, I know. For those who don't want to spend hours learning all this stuff, here is the short version of the process:
Step 1) Almost no sanding necessary! I cleaned each dresser, and spot sanded any flaws that I didn't want to show through the paint. I did want them to look old-ish, so I left a lot of signs of wear.
Step 2) Instead of sanding away the old finish, which would have been a nightmare with all the carved crevices on these pieces, I simply brushed on one coat of a bonding primer. I found this in the paint department at Lowe's. It only came in the one-gallon size, which is plenty for me (and friends who want to use it) to do several pieces of furniture.
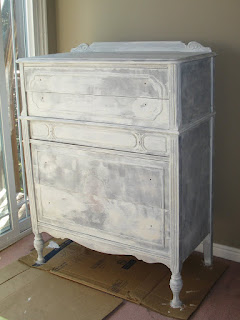
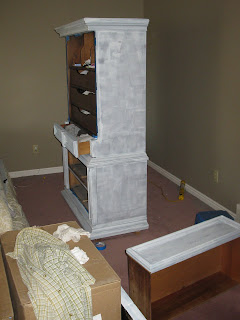
Yes, I painted the dressers with the clothes still in them. I was using a brush, and was careful enough to not drip. And yes, I painted with the piece on the carpet, because I was not keeping that ugly pink stuff! I did raise Kent's dresser on blocks to get the bottom edge done right. And no, I did not paint the insides of the dressers. That just seems like unnecessary work, and paint on the moving parts of drawers would gum them up.
Step 3) Paint! I used semi-gloss paint, which dries hard and stands up to wear. My dresser needed three layers of paint before the darker wood didn't show through the white. Kent's dresser took two layers, and I recommend using at least two layers of paint. I waited at least a day or two between coats to let the paint harden a bit, which makes it easier to sand imperfect paint between coats with a very fine sandpaper.

My painting tools were a small sponge roller that is made for painting cabinets, an angled brush, and a small artist's brush to get into tiny crevices. Using a paint sprayer is preferable, because the brush strokes do show in some areas; but I don't have cashola to buy a sprayer. I wouldn't use canned spray paint on large projects because the fumes are overwhelming, and because I can never completely avoid drips.
Step 4) Finishes. Because I was creating different effects, the finish process differs for each dresesr.
Dresser A) My dresser was to be a solid white color. I let the third paint coat dry for a day and then applied one layer of a clear finishing coat. I chose water-based polycrylic, which won't yellow over time. It dries quickly and protects the paint from chipping or getting rubbed off.
Dresser B) For Kent's dresser, I finished with an antiquing glaze. The glaze itself acts as a protective coat, so no other final coat is needed. In a plastic drinking cup I mixed equal parts glaze (you buy it in the paint department) and dark brown satin finish paint, which I had used on another piece in the bedroom. I painted the colored glaze on and then gently wiped it off with a damp rag a minute later.

The glaze sinks into the carved areas, but wipes of the flat surfaces.
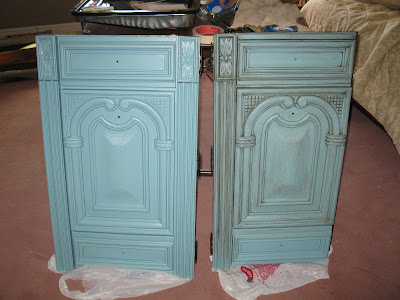
The glaze brings out more details of the carved wood. Whenever part of it didn't look right, I painted the blue over the top and tried again.
Glazing the large sides took a few trial runs until I came up with a good process. I brushed a bit of glaze around the edges, used my now-glaze-filled rag to apply a little brown to the flat sides, and used a dry brush to blend and soften it all.
5) Replace the hardware. For my dresser, I simply cleaned the pulls. Doesn't the dark color of the pulls look great against the white?
For Kent's dresser, I didn't want the brass finish on the hardware. I paid a kid to wash the pulls with a toothbrush and then spray painted them with a brown, hammered effect paint.
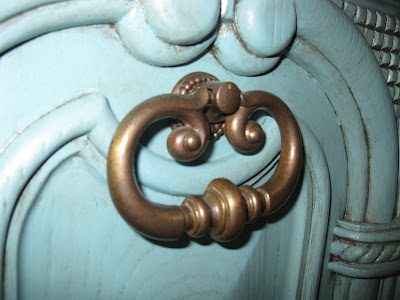
The brass still showed through in spots, but I like how it blends with the hammered paint.
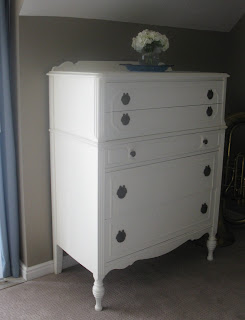
Ready for the "after" photos? Ta da!


I am determined to not clutter the top of this dresser with jewelry and findings from my pockets. At my grandma's funeral last month, we set out Grandma's knick knacks for family members to take home. Somehow I was lucky enough to pick up this blue glass dish that came with my great-great grandmother when she immigrated to Utah from Denmark. This might be the only place in my house where I can display the dish without much worry that my kids will break it. (#4 broke two of grandma's porcelain bells within a week of bringing them home from the funeral.)

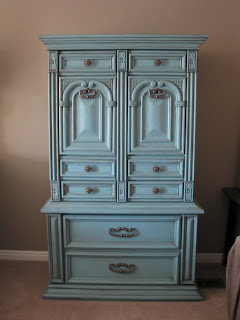
And now for Kent's!
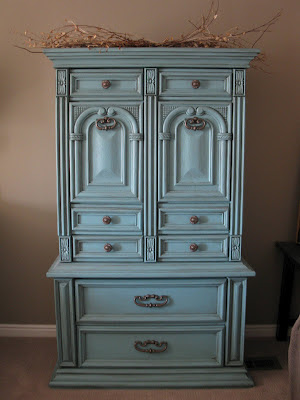
I realize I'm showing basically the same photo, but I want some opinions. Do you like the dresser better with the twiggy swag on it, or with no topper? I've included nature-looking elements in other parts of the room, but I wonder if it's too feminine with those dead plants up there. Kent has been a good sport about the robin's-egg blue, but I don't know if I'm pushing it.
One more time; here are the side-by-side before and afters. I really am so happy with how these turned out!


Yeah, I'm leaning toward the twiggy swaggy thingy.
 I am not a fan of The Patient Protection And Affordable Care Act, a.k.a. ObamaCare. Not only do I think the government has no right to dictate our healthcare requirements and benefits, but this act has affected our family personally.


